mysql> CREATE BDATABASE POSTING_DB -> DEFAULT CHARACTER SET UTF8;
mysql> create table POSTING.POST( -> number int not null auto_increment primary key, -> title varchar(200) not null, -> content text not null);
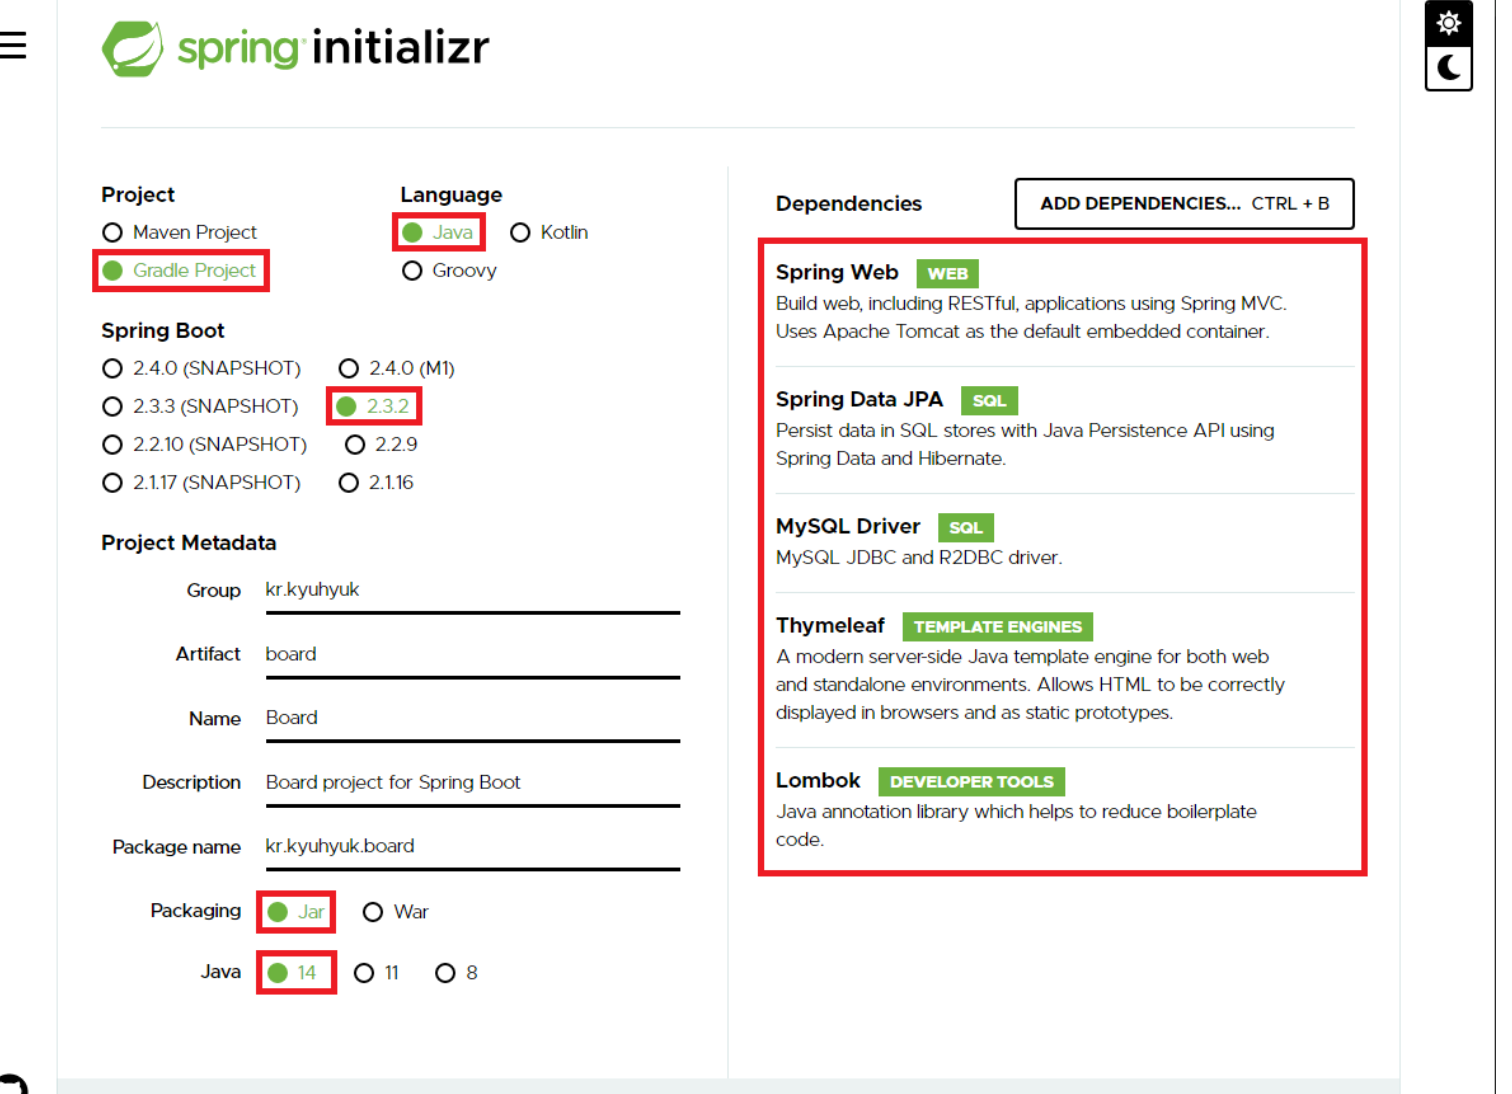
db생성 및 유저 생성
여기에서 나는 example대신 post_db로 하였다.
1 2 3 4 5
mysql -u root -p
mysql> create database example DEFAULT CHARACTER SET UTF8; -- example라는 데이터베이스를 생성합니다. mysql> create user 'user'@'%' identified by 'UserPassword'; -- user라는 사용자를 생성합니다. mysql> grant all on example.* to 'user'@'%'; -- user 사용자에게 example 데이터베이스의 모든 권한을 줍니다.
JPA Auditing 기능을 사용하기 위해 main 클래스(PostingPracticeApplication)에 @EnableJpaAuditing 어노테이션을 붙여줍니다.
Repository 구현
Repositroy는 데이터 조작을 담당하며, JpaRepository를 상속받는다.
JpaRepository의 값은 매핑할 Entity와 id의 타입이다.
JpaRepository를 상속받으면, 원래 손수 구현해야되는 save(), findById()등등이 이미 구현되어있다
domain/repository 패키지안에 DBPostingRepository 인터페이스를 만들었다
1 2 3 4 5 6 7 8 9 10 11 12 13 14 15 16 17 18 19
publicinterfaceDBPostingRepositoryextendsJpaRepository<PostingEntity, Long> { } // 이친구가 옵셔널로 데이터를 주는 경우에 대해서. // 스프링을 사용할때 왜 이렇게 c -> s -> r , r -> s -> c 구조를 유지하는가? // 결국은 레이어에대한 책임과 역할 때문이다. // 무슨말이냐? 일반적인 요청에 대한 흐름이 validation(검증) -> business(로직) -> cascade(영속화) // 이 기본적인 생각을 머리에 품고, // 근데 이게 왜 좋음? 왜 저렇게 해야 됨? // 그냥 옵셔널 쭉 가지고 가다가 마지막에 검사하면 안됨? // -> 안돼. 왜 와이, 그러면 중간 비즈니스가 반드시 모든 경우에 대해서 생각해줘야 돼.
// 다시 원제로 돌아와서, // 이 인터페이스는 왜 옵셔널로 줄까? -> 있으면 데이터를 뽑아 주겠는데 그걸 확신을 못하니까 // 슈뢰딩거의 데이터다. (까보기전엔 몰?루) // 인터페이스에서 이데이터에 접근할때는 강제로 get() or isPresent 확인을 해서 쓰도록 강제하고 있다.
// 그렇다면 위 생각과 접목시켜서 응용하면 // 1. repository -> service -> controller 로 갈때, 어느 부분에서 이 데이터가 있음을 검증하는 것이 옳을까? // 2. 우리는 데이터가 있고 없을 때, 정책적으로 어떻게 결정할 것인가?
DTO 구현
Controller와 Service 사이에서 데이터를 주고받는 DTO(Data Transfer Object)를 구현한다.
DTO는 전달체일뿐(+직렬화함수 가짐), 로직을 포함해서는 안된다. 반드시 로직은 Service에서만!
domain에 dto패키지 만들고 PostingDto 생성
아래 toEntity()는 DTO에서 필요한 부분을 빌더 패턴을 통해 Entity로 만드는 일을 한다
publicPostingController(PostingService postingService){ this.postingService = postingService; } @GetMapping public String get(Model model){ List<PostingDto> postingDtoList = postingService.getPostList(); model.addAttribute("postings", postingDtoList); return"basic/items"; } @GetMapping("/{id}") public String getpost(@PathVariable Long id, Model model){ PostingDto postingDto = postingService.getPost(id); model.addAttribute("posting", postingDto); return"basic/item"; } @GetMapping("/{id}/edit") public String getEditForm(@PathVariable Long id, Model model){ PostingDto postingDto = postingService.getPost(id); model.addAttribute("posting", postingDto); return"basic/editForm"; } @PostMapping("/{id}/edit") public String edit(@PathVariable Long id, @ModelAttribute PostingDto postingDto){ postingService.editPost(postingDto); return"redirect:/basic/posting"; } @GetMapping("/{id}/delete") public String delete(@PathVariable Long id){ PostingDto postingDto = postingService.getPost(id); postingService.deletePost(postingDto); return"redirect:/basic/posting"; } @GetMapping("/add") public String post(){ return"basic/addForm"; } @PostMapping("/add") public String write(PostingDto postingDto){ postingService.savePost(postingDto); return"redirect:/basic/posting"; }
}
추가적 질문사항에 대한 답변
왜 DTO를 사용해야하나?
DB와의 통신에 대해서는 비용이 많이 발생하는데, 이를 최소화하기위해 데이터 모아 한번에 전송하기위해 DTO를 사용한다.
DB에 전달하기 위해선 직렬화 과정이 필요한데, DTO에 직렬화에 관한 부분을 정의하므로써, 코드의 중복제거 및 책임을 강화할수있다.
추가
DAO, DTO, VO
DAO: Data Access Object 로 DB의 data에 접근하기 위한 객체다. DataBase접근 하기 위한 로직& 비즈니스 로직을 분리하기 위해 사용 Service와 DB 연결하는 고리
DTO: Data Transfer Object 는 계층간 데이터 교환을 하기 위해 사용하는 객체>> 로직가지지 않고 순수한 데이터 객체(getter&setter만 가진 클래스)이다 DB데이터를 Service와 Controller 사이에서 연결하는 고리
VO: 값 오브젝트로써 값을 위해 쓰인다. read-Only특징(DTO와 유사하나, setter가 없으므로 값 변화못함)
@builder의 장점
점층적 생성자의 단점(매개변수 수에 따라 다른 생성자 정의, 사용자입장에서는 어떤것이 들어갓는지모름) 해결
@builder를 달면, 클래스 내부에 각 요소에 대한 setXXX가 생성되며 return 값으로 this를하여 Builder객체를 완성후 build()를 호출할때 최종적으로 원하는 객체를 반환해준다.(https://esoongan.tistory.com/82)
전체 구조에 관한 질문
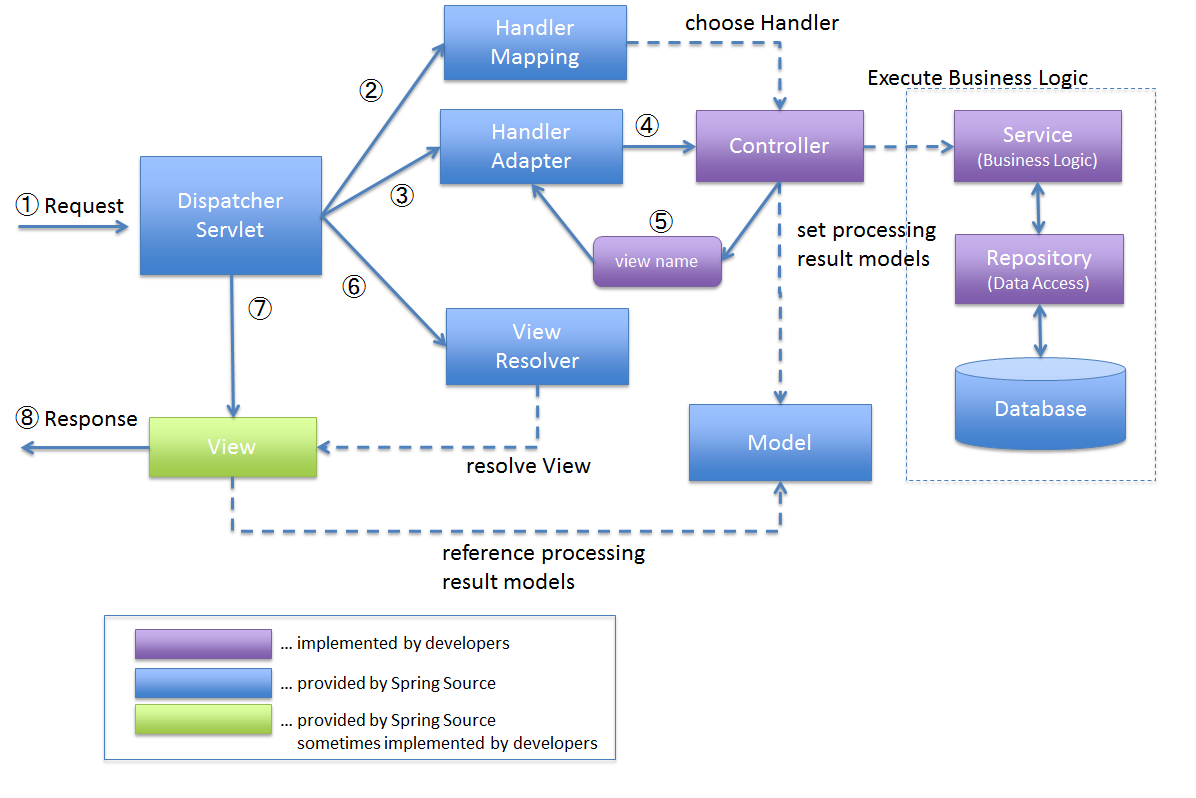
왜? 이런 구조를 가졋을까?
아래구조
각 핵심 기능(역할)을 충실히 하고있다고 생각하면된다.
Dispatcher가 FrontController로의 역할로 Handler로 등록된 controller 찾고 해당되는 adapter를 찾아 handle()를 호출하여, 우리가 정의한 controller가 실행된다>> 그후 ModelAndView객체를 최종젹으로 Dispatcher가 받아 이를 View Resolver를 통해 논리 경로를 물리경로를 가진 view를 반환하여, view.render(각종인자)를 호출하여 최종적으로 view가 응답을 하게된다.
알맞는 Adapter는 controller의 반환값에 따라서 결국엔 ModelAndView로 값을 변경후 반환하므로 Dispatcher입장에서 코드를 변경할 필요를 없게 만들어준다
Controller는 필요한 Service를 호출하여, 결과를 Model에 담고, view name반환 이때는 DTO로 Service와 데이터 소통
Service는 핵심 비즈니스 로직을 가지고,Repository와 소통 이때는 Entity와 DTO간의 전환
Repository는 실제 DB와 Entity로 소통
결국에는 Entity로 DB를 가져오고(자동) JPA가 제공하는 툴로 service나 controller에서는 DTO를 활용하고 service와 DB사이에서는 Entity를 활용해야함
추측
Entity로 JpaRepository를 연결했으므로, Entity는 하나의 테이블이라고 생각하면될것이다???
@Transactional public PostingDto getPost(Long id){ Optional<PostingEntity> posting = dbPostingRepository.findById(id);
if (posting.isPresent) {
// 있으면 리턴한다. return posting.get().toDto(); } else {
// 없으면 다른 로직을 태운다. TODO(do something else) 1. 그냥 빈 데이터를 보여준다 (디폴트 에러 객체를 내보낸다 or 다른 우회 로직) => 보안프로그램을설치하는지 체크합니다. -> 없어 -> 보안프로그램 설치 페이지로 -> 안내
2. 익셉션을 발생시킨다. => 없는 계좌번호로 송금시도 -> 없어 -> 에러 } }
1 2 3 4 5 6 7 8 9 10 11 12 13
// 다음 과제 // 사용자가 있음, 사용자는 회원가입으로 가입할 수 있고(시큐리티 적용같은건 자유, 그냥 아무렇게나 구현) // 사용자는 글을 작성/수정/삭제 할 수 있음. 사용자는 자신의 글만 수정/삭제 할 수 있음. // 사용자는 다른 사람의 글은 볼 수만 있음 // 각 글은 어떤사용자가 작성했는지 확인할 수 있음.
// 사용자는 다른 사람의 글에 댓글을 달 수 있음. // 댓글은 댓글 작성자만 삭제할 수 있음. // 원 글이 삭제되면 댓글도 같이 삭제됨. // 대댓글은 달 수 없음. // 댓글은 수정이 불가능함.